Slide Title 1

Aenean quis facilisis massa. Cras justo odio, scelerisque nec dignissim quis, cursus a odio. Duis ut dui vel purus aliquet tristique.

Slide Title 2

Morbi quis tellus eu turpis lacinia pharetra non eget lectus. Vestibulum ante ipsum primis in faucibus orci luctus et ultrices posuere cubilia Curae; Donec.

Slide Title 3

In ornare lacus sit amet est aliquet ac tincidunt tellus semper. Pellentesque habitant morbi tristique senectus et netus et malesuada fames ac turpis egestas.

Wednesday, December 30, 2009

Joomla Tutorial Series: How to Install Joomla 1.5

This tutorial is the first series from Joomla Tutorial Series I have plan to write. This joomla tutorial translate are slightly different from the indonesian, because my English not good at all.
The joomla we use here is new joomla stable version, version 1.5.x. The litle x mean the minor release of current joomla. Today, when I write this tutorial, the minor release is Joomla 1.5.2.
What is Joomla?
As far as I know:
Joomla! is a free open source framework and content publishing system designed for quickly creating highly interactive multi-language Web sites, online communities, media portals, blogs and eCommerce applications.
Joomla! provides an easy-to-use graphical user interface that simplifies the management and publishing of large volumes of content including HTML, documents, and rich media. Joomla! is used by organisations of all sizes for Public Web sites, Intranets, and Extranets and is supported by a community of thousands of users.
So, joomla is smart cms we use for everything, its up to you what you use joomla for.Although joomla is multi-purpose content publishing system for websites, joomla is not suitable enough to be comfortable blog engine. In this case, I prefer wordpress than joomla.

Joomla Pre-Installation
Before we use joomla, we need to install it first. Before installation we will need:

  1. Apache Web Server. Better if we have rewrite module for SEO, and others to improve joomla power.
  2. MySQL Database. MySQL is optimized database for joomla. You can use another databases, but we need extra work and setup for it. MySQl is the best.
  3. A copy of Joomla installer. Go get it here, if you dont ready have one.
If you have buy a commercial webserver, you can use fantastico tool through your cpanel, instead do manual install as we discuss here. If you do, then this tutorial dont give advantage too much for you.
The next, open your browser, my favorite is Firefox. Open your phpmyadmin page. if you use LAMPP like me, open it here: http://localhost/phpmyadmin/.Crete a new database by type it new name. For example, I use ltguide as new database name.
create new database from phpmyadmin for joomla
database for joomla has created by phpmyadmin
Installing Joomla
I have installing joomla in my local webserver. I extract the joomla installer in usermode.web.id directory. After extracting, please open your browser and go to http://localhost/usermode.web.id or wherever you extracting joomla before.
choose your language for joola installation
The first step is to choose installation language to use. Please choose the suit language from the list.
check your server whether it meet joomla requirement
Second step is to check your web server requirements that meet joomla. If you see the green color words written, that mean you pass for the requirements. Otherwise, red color mean the requirements must be corrected before we go to next step. For example, if your register globals on your php requirement is red (on), open your php.ini configuration file and toggle it to off.
Third step is to accept the joomla aggrement and license. If you dont agree, please close your browser and dont install joomla.
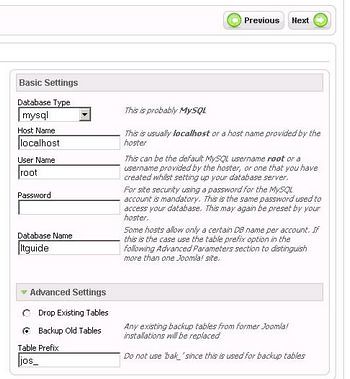
configuring database using joomla
Fourth step is configure the database. Joomla will ask for database server address, username and password to use. In local webserver, I think its not difficult. The problems will appear if you enter unassigned or different username for database. So, make sure the database and the username, also password is match and assigned.
configuring ftp layer using joomla
Fifth step is configure ftp layer. This joomla feature important for maintain file and folder. You need it to let joomla configure the right permission for better security issues. If you want to do it manually, dont enable it and let it empty. Before go to next step, may you want to test the FTP connection setting, push the “Verify FTP Settings” button.
configuring your website use joomla
Sixth step is configuring you website. Enter your website name, password and email addres to use and then if you are new to joomla, may you need to installing the sample data. The default sample data contain some informations and mini howto from joomla developer.
configuring your website use joomla
Finish!, congratulation! Now you have a fresh joomla powered website.
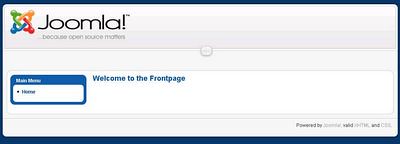
fresh joomla installation homepage
If you want to access your administration panel, you can acces it on http://localhost/instalasi_joomla/administrator.
joomla administrator panel
After installation, is a good practice to change the configuration.php file permission in your root directory and to delete the installation folder.

OK, this is the end of first series of Joomla Tutorial Series. The next series, we will discuss about how to create menu, content, and managing modules.

Tuesday, December 29, 2009

Smadav 2009 Rev 7.5 – Faster More Light


Smadav 2009 Rev. 7

In Rev. SmadAV 7 times this has been enhanced to be much faster and lighter in detecting and securing your computer from virus threats in Indonesia. New features added such as Smad-Turbo (Scanning 10x faster), Smad-Theme (Changing the color theme), Smad-Ray (Auto flash is very fast scan). This all makes SmadAV become one of the fastest antivirus and lightest in the world, so SmadAV still be used on computers with lower specifications though.

In Rev. 7 It also adds a database SmadAV introduction of new viruses that spread across much of Indonesia. The development of local virus currently diminishing as active and not the preceding months. Maybe it's because SmadAV already widely used computer users in Indonesia. Thus, local virus in Indonesia now live a little longer to get to extinction.

In addition, too many improvements made to the view that the overall SmadAV SmadAV easier and practical to use. The following is a description of the new features in SmadAV 2009 Rev 7:

Smad-Turbo (Scanning 10x faster)
Smad-Turbo is one of the fastest antivirus scanning feature in the world that belongs only SmadAV Pro. If the Free SmadAV takes you 20 minutes to scan the entire contents of computer files, using this feature you only need to take approximately 1-2 minutes to scan the entire contents of the file on your computer. So, Scanning SmadAV Pro 10x faster than SmadAV Free to use these Smad-Turbo.

Smad-Theme (Changing color themes)
SmadAV Pro has the ability to change the color theme originally SmadAV green became the color of your choice. On the theme color settings you can find your own color choices for the theme SmadAV. After you change the theme color, the color of all SmadAV display will automatically turn into the color of your choice.

Smad-Ray (Auto flash is very fast scan)

After the flash plug-in computer disks, SmadAV will immediately bring the scan results in the form of notification if your flash is infected with a virus or not, the process is very fast only about 1-5 seconds so you do not need a long wait for the results of scanning the new flash plug.
Repair SmadAV view
Display SmadAV long been considered a user who is still too large and not suitable for some users in Mini Laptop / Netbook. In Rev. This time the display 7 SmadAV been smaller and SmadAV can adjust the size to be used in mini Netbook.

Comparison SmadAV Free & Pro
At the donation tab now has added the comparison table SmadAV Free & Pro. You can click on the lines of this table to see the advantages compared SmadAV SmadAV Pro Free.

Completion SmadAV Rev. 2009. 7.1

    
* Addition of new virus database
    
* AutoUpdate for SmadAV Pro on Vista & Win7
    
* Bug fix Scan with SmadAV
    
* Loading Quarantine faster
    
* Send statistics to the server SmadAV
    
* Bug in clearing the virus fusion

Completion SmadAV Rev. 2009. 7.2

    
* Added features in Exception 1-Virus Tools By-User
    
* Added many new virus database
    
* Improved connection with the server program Smadav.net SmadAV
    
* Improved protection registration key anti-piracy

Completion SmadAV Rev. 2009. 7.3

    
* Clean thoroughly for several new viruses
    
* Adding intelligence (heuristic) virus detection SmadAV
    
* Improved update method SmadAV
    
* Replacement of the primary server Smadav.net
    
* Improvement of detection in some programs

Completion SmadAV Rev. 2009. 7.4

    
* Smad-Behavior (Beta), a new feature for the protection SmaRTP computer program based on behavior
    
* Clean thoroughly for 55 new local virus
    
* Completion of cleaning the virus more quickly SmadAV
    
* Added button "More" at the scanner
    
* Changing the folder name "Smad-Lock" to "Smad-Lock (Safe SmadAV)"
    
* Shipping Smadav.net statistics to the server, to prevent piracy SmadAV Pro
    
* Additions to explore the function of quarantine
    
* Improved bug in the file selection dialog when the virus by 1 user

Completion SmadAV Rev. 2009. 7.5

    
* Adding a local database 103 new viruses
    
* Completion of Smad-Behavior to avoid False Positive
    
* Adding some new heuristic techniques
    
* Improvements SmadAV bug that causes hangs when scanning a particular file
    
* Improvement of protection and blacklists to use pirated Pro SmadAV
    
* Improved automatic refresh bug on tree-directory display 

  
How To Download Smadav?
Just Click Link Below

Download Smadav 2009 Rev. 7

For Pro Version:
Click this URL
Key Smadav Pro

Tutorial Download From Rapidshare

Ok since so many peoples are just coming in here asking how to download
or how to use the content you download, I decided to make a little
guide, if anything is wrong in the informations I am providing, Please
feel free to correct me.


First of all, Most of the download out there for EVERYONE are
Rapidshare/Megaupload/Others. I will explain here how to use Rapidshare
and Megaupload since they are the most commons.


RAPIDSHARE

There are usually many rapidshare links provided with a file, this is
due to a file splitting since rapidshare only support files of 100mb
and less for free users.

When you get on the page of something you want, you'll get something
like this. (THIS IS AN EXAMPLE ONLY, I DID NOT EVEN PUT ALL THE LINKS
TO SAVE SOME SPACE)
Now let's say you wanna start downloading it, copy the first link, and
paste it in your browser. It'll send you on Rapidshare page.


STEP 1.

Scroll down the page till you see this:


You see where it's written click here? Click there, but on YOUR page,
not on the forum picture. (Just for the really unsmarts of us)


STEP 2.

Now that you're on the new page, scroll down till you see this:


Follow the instructions and then you can click on Download via...(From
where you download doesn't really matters, what is written after via
doesn't really matter either so just click on download.)


STEP 3.

Now to download a file... Some of you might not know how so here you go!


Quite simple


Repeat these steps till you get all the parts of your file. After
you're done downloading, comes the unpacking step which is explained
DOWN THERE, Keep scrolling down the page, It's explained after the
Megaupload section.


NOTICE: You can only download 1 file per 2 hours if you are using the free service, there are 4 ways to bypass this check.


1. If you are with a ISP providing dynamic ips, you can reboot your
modem to get a new ip. "How do I know if my ISP is dynamic ips?". Doh,
Reboot your modem and test it.


2. Use a proxy, I don't have a guide on how to use a proxy so if anyone feels like making one, go ahead.


3. Buy a premium account.it is a best way

Monday, December 28, 2009

Welcome to My World

Welcome to my blog. This blog contains all the information about the tutorial you need every day. If you want some tips and tutorials, please write your request in the comments section.
The information on this blog are free to publish to anyone if not for commercial purposes.